Getting Started
You can access Deskdragon on the web, or through our native apps on Android and iOS.


Logging In
Deskdragon works with your existing Microsoft or Google Workspace credentials. You do not need to create a separate account or remember a different password.
Tap on either the "Sign in with Google" or "Sign in with Microsoft" button, and follow the prompts to sign in with your work credentials.
Sign in with your business
Google Workspace or Microsoft 365 account.
By signing in you agree to the
Deskdragon Terms and Privacy Policy
First time? If your company has already set up Deskdragon, you will automatically be added to your company's workspace when you sign in for the first time using your work email address.
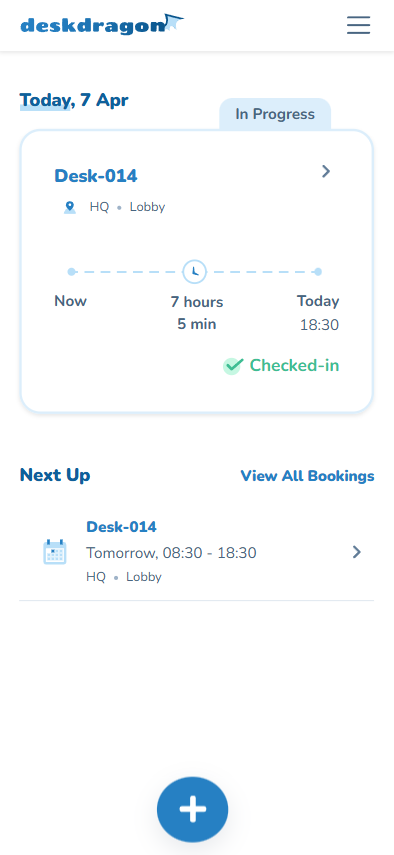
Today's Bookings
When you open Deskdragon, a summary of your bookings for today will be shown. If your current booking is in progress, its status and details are displayed prominently.
What you'll see
- 1 Current booking. Your active or next booking for today, showing the desk name, building, floor, and time range.
- 2 Status badge. Shows whether a booking is "In Progress", or if check-in is available.
- 3 Next Up. Your upcoming bookings listed below the current one.
- 4 View All Bookings. Tap to see all upcoming and past bookings.
Tap on any booking to view its location on the floor plan and access actions like editing or deleting.
Viewing All Bookings
Tap on "View All Bookings" from the main screen to see a complete list of your bookings. You can switch between Upcoming and Past tabs.
Communal-Desk-017
Apr 8, 08:00 AM - 05:00 PM
Communal-Desk-019
Apr 9, 08:00 AM - 05:00 PM
Lobby-Desk-005
Apr 7, 10:29 AM - 02:29 PM
Floor2-Desk-014
Apr 4, 08:00 AM - 04:00 PM
The Upcoming tab shows bookings sorted by start time. The Past tab shows your booking history in reverse chronological order. Tap on any booking to view its details.
Viewing a Booking
Tap on any booking to see its full details. This shows your desk's location on an interactive floor plan, along with the booking's date, time, building, and floor.
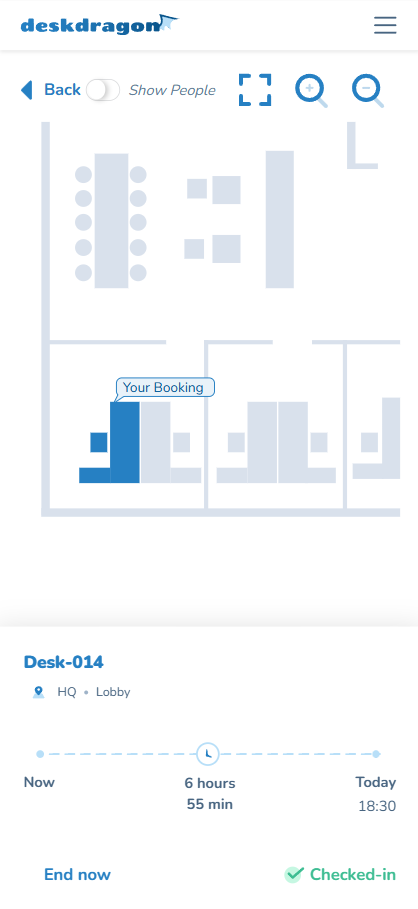
From this screen, you can edit or delete the booking if it hasn't started yet. If a booking is already in progress, you can end it early instead.
Tip: You can pan and zoom around the floor plan to get a better view of your desk's location. Use the "Show People" toggle to see who else has booked nearby desks.
Creating a Booking
From the main screen, tap the + button to open the booking screen. This is an all-in-one view where you set the date, time, and desk on a single interactive screen.
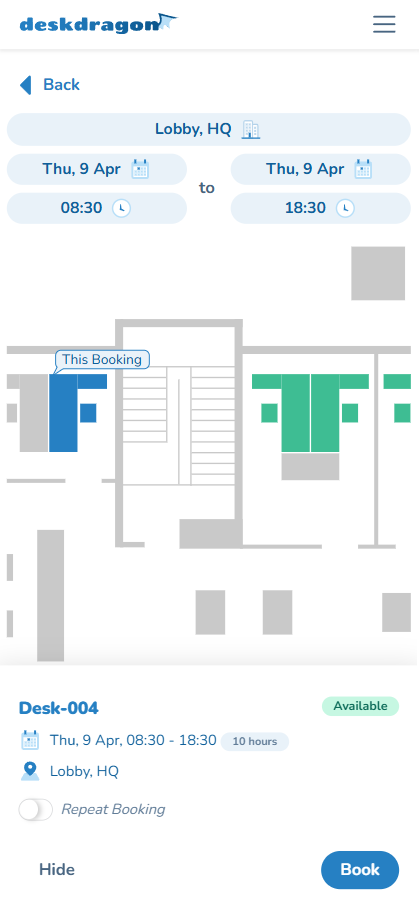
How it works
The booking screen shows everything on one page: date/time controls at the top, the interactive floor plan in the centre, and desk details at the bottom when you select a desk.
Set the date and time
At the top of the screen, you will see tappable pills for the start date, start time, end date, and end time. Tap any pill to open a date or time picker. The floor plan updates automatically to reflect desk availability for your selected times.
Dates and times must be within the range allowed by your company's booking policies. This may include a maximum booking duration and a limit on how far in advance you can book.
Choose a building and floor
If your company has multiple buildings or floors, tap the building/floor pill at the top to open a location picker. Each building and floor shows the number of free desks available for your selected time. Tap a floor to load its floor plan.
Select a desk on the floor plan
The interactive floor plan displays all desks with colour-coded availability. Tap on a desk to select it. You can pan and zoom around the floor plan to find your preferred desk.
Availability alerts: If no desks are available for your desired time, you can opt in to receive a notification when a desk becomes available. Look for the "Notify when available" option on the booking screen:
Review and confirm
When you select a desk, a bottom sheet slides up showing the desk name, availability status, amenities (e.g. standing desk, dual monitors), date/time summary with duration, and the building/floor location. Tap "Book" to confirm. You will receive a confirmation email.
Tip: Toggle "Show People" at the bottom of the screen to see who has booked other desks during your selected time.
Editing a Booking
You can modify a booking that hasn't started yet. From the booking details screen, tap the "Edit" button.
This opens the same booking screen used for creating a booking, with your existing date, time, and desk pre-filled. Your currently booked desk is highlighted with a blue outline on the floor plan. Change the date, time, or desk as needed and tap "Update" to save your changes.
Note: You can only edit bookings that have not yet started. Bookings that are already in progress can only be ended early.
Deleting a Booking
A booking can be cancelled by tapping the "Delete" button on the booking details screen.
Since this action cannot be undone, you will be asked to confirm before the booking is permanently removed.
Delete Booking
Are you sure you want to delete this booking?
Check-in
Depending on your company's settings, you may need to check in when your booking starts. This helps confirm desk usage and keeps your workspace data accurate.
Button Check-in
When your booking's check-in window opens, a "Check In" button will appear on the main screen and on the booking details page. Simply tap it to confirm your arrival.
QR Code Check-in
If your company uses QR code check-in, you will be prompted to scan a QR code at your desk using your device's camera. Position the QR code within the scan frame, and check-in will happen automatically.
Check-in status
You can also check in via the email reminder link sent before your booking starts, which will open the app and check you in directly.
Profile & Settings
Access your profile settings by tapping the person icon in the bottom right corner of the main screen (mobile) or the navigation menu (desktop). Your profile has three pages:
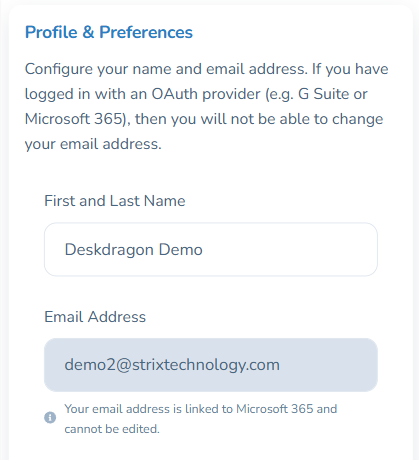
Profile & Preferences
Configure your name and email address. If you logged in with an OAuth provider (e.g. Google Workspace or Microsoft 365), your email address cannot be changed.
-
First and Last Name
Update your display name as it appears to other users and in booking records.
-
Email Address
Shown for reference. Your email is linked to your OAuth provider (Google Workspace or Microsoft 365) and cannot be edited.
-
Display 24-hour clock
Toggle between 24-hour format (e.g. 16:00) and 12-hour format (e.g. 4 PM) for all times shown in the app.
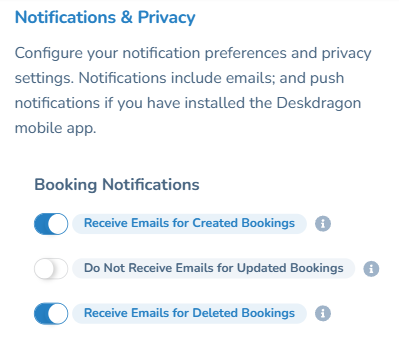
Notifications & Privacy
Control which emails and push notifications you receive. Each option can be individually toggled on or off:
Booking Notifications
- • Receive emails for created bookings
- • Receive emails for updated bookings
- • Receive emails for deleted bookings
Calendar Invitations
- • Add calendar invitations (.ics files) to booking emails. Allows you to add bookings directly to your calendar. Enabling this automatically enables all booking email notifications.
Check-in Notifications
- • Receive emails for check-ins
- • Receive push notifications for check-ins (requires the mobile app)
Analytics Digests (admins only)
- • Receive weekly analytics digest. A review of the past week and a preview of the week ahead, sent every Monday
- • Receive monthly analytics report. A PDF report with a full analytics breakdown, sent on the last day of each month
Privacy
- • Show my name on booked desks. Controls whether your name is visible to colleagues when they view a desk you have booked
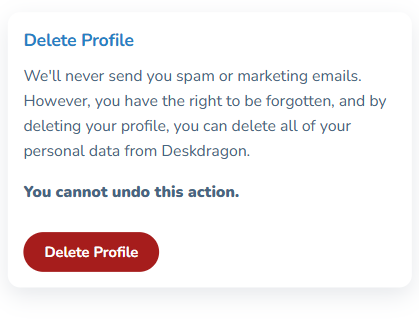
Delete Profile
You have the right to be forgotten. By deleting your profile, you can remove all of your personal data from Deskdragon.
You cannot undo this action. Once deleted, your account and all personal data will be permanently removed.
Signing Out
Tap "Sign out" on the settings page to sign out of your Deskdragon account. This will clear all session information from the device and you will need to sign in again to use the app.
You can also tap "Contact support" from the profile page to send an email to the Deskdragon support team if you need assistance.
Admin Guide
Company admins have access to additional settings to configure the workspace, manage users, and view analytics. Access admin settings from the Settings menu in the navigation.
Settings menu
Bookings
There are three user roles: User (can only manage their own bookings), Booking Administrator (can manage bookings on behalf of others), and Administrator (full access to all settings).
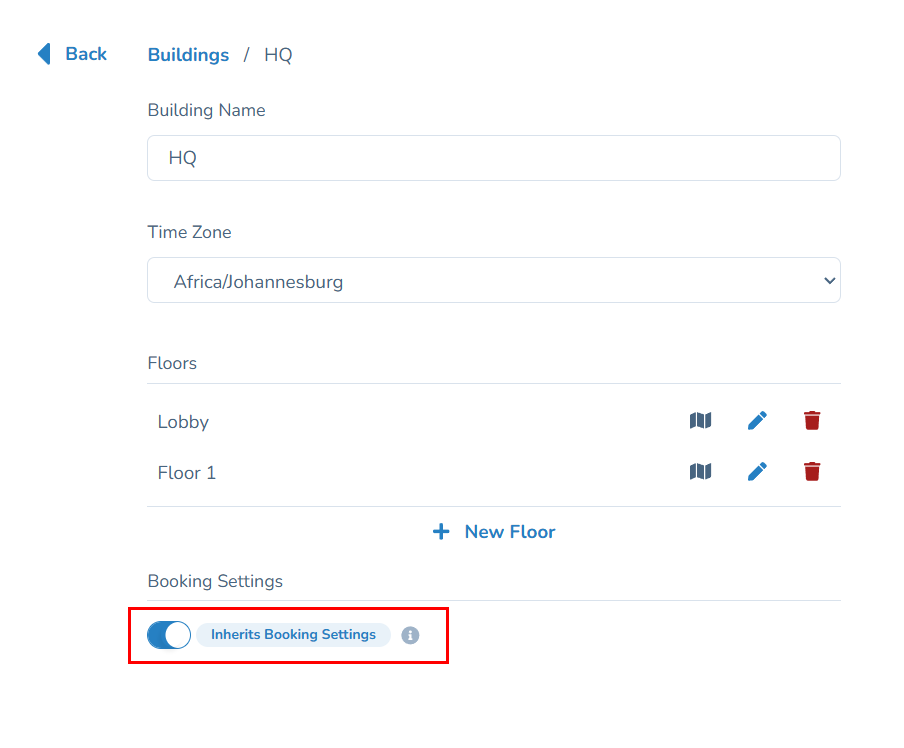
Buildings & Floors
Set up the physical structure of your office by creating buildings and floors. Each building can have multiple floors, and each floor can have its own floor plan and set of desks.
Buildings
- • Create, edit, and delete buildings
- • Assign a timezone to each building. All booking times for that building will be displayed in its timezone
- • Drag and drop to reorder buildings in the list
Floors
- • Add floors within each building
- • Edit floor names and reorder floors by dragging
- • Quick-access link to the Floor Plan Editor for each floor
Per-building overrides
Each building can optionally override the company-wide booking and check-in settings. This allows you to set different default start/end times, maximum booking durations, advance booking windows, and check-in rules per building.
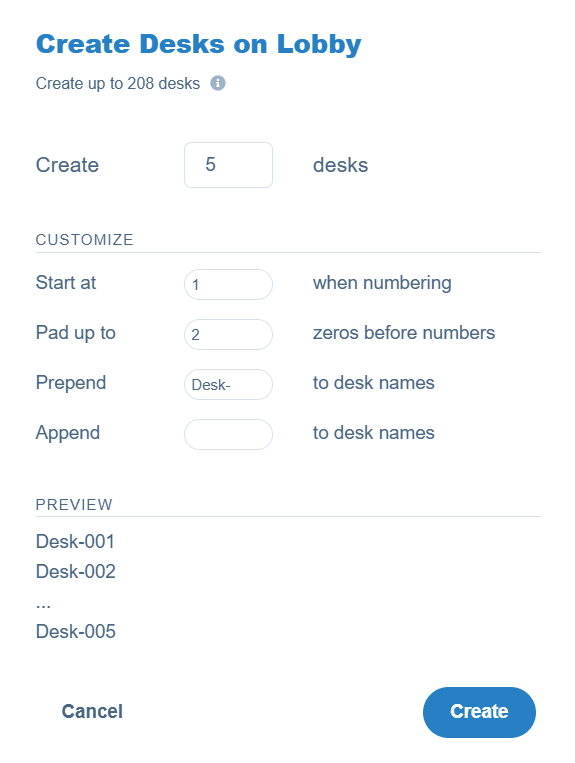
Desks
Add and manage desks for each floor. Desks are the bookable resources that your users will reserve.
Creating desks
- • Create multiple desks at once with customisable numbering (start number, zero-padding)
- • Prepend or append text to desk names (e.g. "Lobby-Desk-001")
- • Live preview of desk names before creating
Managing desks
- • Select a building and floor to view its desks
- • Edit desk names individually
- • Add amenities to desks (e.g. standing desk, dual monitors, window seat). Users will see these when selecting a desk
- • Assign a desk to a team to restrict who can book it
- • Enable or disable individual desks to temporarily take them out of service without deleting them
- • Delete individual desks
Bulk actions
For each floor, you can disable all desks, enable all desks, or delete all desks in a single action.
Floor Plans
Floor plans give your users a visual representation of the office layout when booking desks.
- • View the status of floor plans for each building and floor (created or not yet created)
- • Open the Floor Plan Editor to draw or update a floor plan
- • In the editor, upload a background image of your office layout
- • Drag desks into position on the floor plan
- • Add text labels and shapes to help users orient themselves (e.g. "Reception", "Kitchen", "Server Room")
Linking desks to shapes
Each desk in your office needs to be linked to one or more shapes on the floor plan. This is what lets users see desk availability and choose where to sit when they book.
Linking a single shape
Click a shape on the floor plan (or in the Objects panel on the right). With the shape selected, open the Linked Desk dropdown and choose the desk you want to assign. Desks marked "Not linked yet" are still available; desks marked "Linked already" are in use elsewhere on this floor.
Linking multiple shapes to one desk
Some desks are made up of more than one shape on the floor plan, for example an L-shaped desk drawn as two rectangles, or a desk paired with a separate chair shape. You can link several shapes to the same desk so they behave as a single unit when users book.
- • Click the first shape, then hold Shift and click each additional shape you want to include
- • The right-hand panel will show "N Objects Selected" with a "Link Desk to N shapes" dropdown
- • Pick a desk from the dropdown to link all selected shapes to it
- • The shapes are automatically grouped, so they move, highlight, and respond as one when users hover or click on the floor plan
- • To remove the link, select the shapes again and choose "None (Unlink All)" from the same dropdown

Tip: When you save the floor plan, both the desk links and the groupings are remembered, so users always see the full desk shape highlighted as one when browsing your office layout.
Tip: On paid plans, Deskdragon offers a complimentary floor plan drawing service. Contact support if you would like help setting up your floor plans.
Capacity Limits
Control the maximum number of people allowed in your office on any given day. This is useful for compliance with occupancy regulations or to manage office density.
- • Choose between no capacity limits, per-building limits, or per-floor limits
- • Set capacity as a percentage of total desks
- • Use quick-set buttons (35%, 60%, 100%) or enter a custom percentage
- • Colour-coded badges show the current capacity level for each building or floor
Capacity limits is a premium feature. If this feature is locked, you may need to upgrade your subscription.
Users
View and manage all users in your Deskdragon workspace. Users are automatically added when they sign in with an email address from your configured domain.
User list
The main Users page shows all users in your workspace. You can search and filter by name, email, or status. Each user shows their role, status (Active or Invited), and last login time.
From this page you have two actions available:
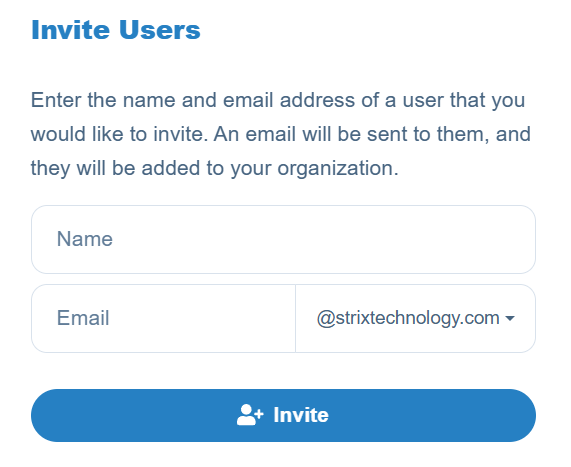
- • Invite Users. Opens a dialog where you enter a name and email address. An invitation email will be sent and the user will be added to your organisation
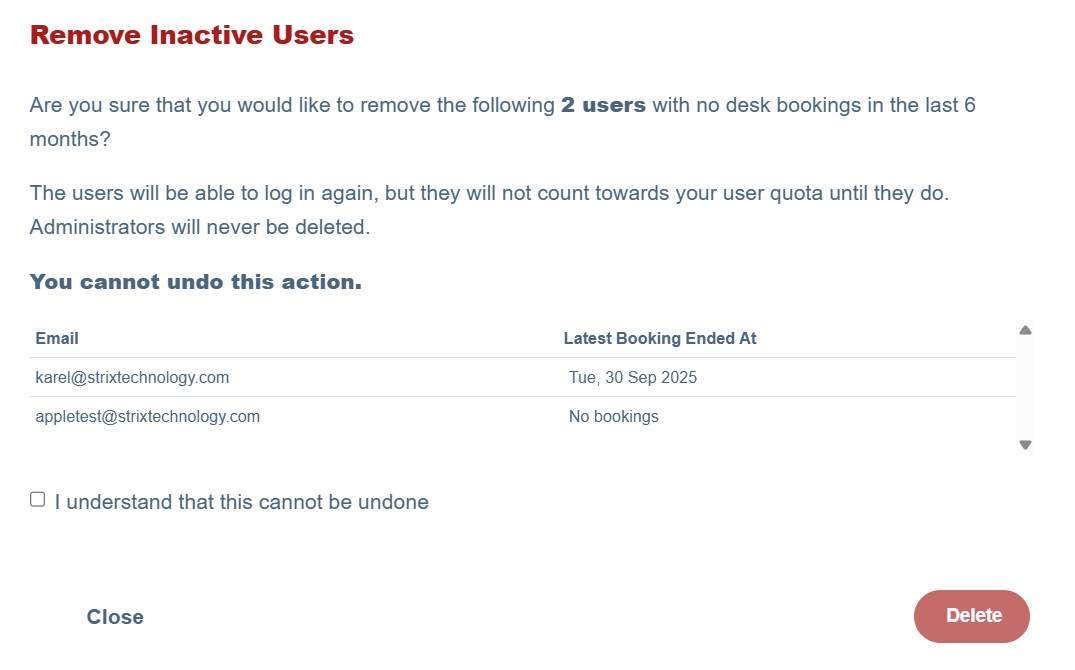
- • Remove Inactive Users. Identifies users with no bookings in the last 6 months. You can review the list and confirm removal. Admin users are never auto-deleted
Viewing a user
Click on any user in the list to open their detail page.
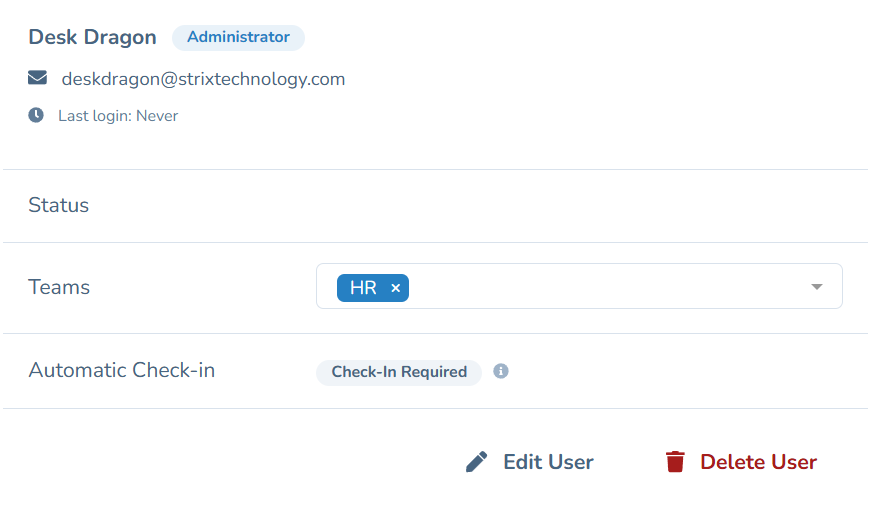
From here you can:
- • Assign teams. Use the multiselect dropdown to add the user to one or more teams
- • Automatic Check-in. View whether the user is required to check in or is automatically checked in
- • Edit User. Opens the edit form (see below)
- • Delete User. Removes the user and prevents them from logging in. You can restore a deleted user from this same page
Editing a user
From the user detail page, click "Edit User" to open the edit form. Here you can change:
- • Name
- • Role. Choose between User, Booking Administrator, or Administrator (you cannot change your own role)
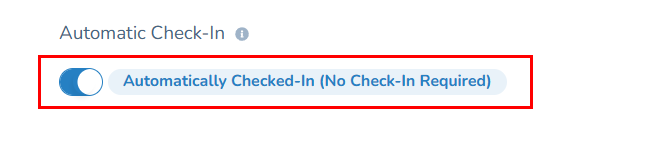
- • Automatic Check-in. Enable this to exempt the user from having to check in to their bookings
Import and export
From the user list page, you can also import and export users:
- • Import users from a CSV file with a guided multi-step process: upload, map columns, preview, and confirm. You can choose how to handle duplicates (skip, update, or fail)
- • Export users to Excel (.xlsx) or CSV format
Teams
Organise users into teams and departments. Teams can be used for analytics, desk restrictions, and organisational structure.
- • Create teams with a name and optional parent department
- • Teams can be nested: departments contain sub-teams, which contain members
- • Add and remove members from teams by searching for users
- • View member counts for each team
- • Import teams from a CSV file
- • Delete individual teams or delete all teams at once
Domains
Domains control which email addresses can access your Deskdragon workspace. When a user signs in with an email from a linked domain, they are automatically added to your workspace.
- • View your main domain and any additional linked domains
- • Each domain shows its status: Active or Pending
- • To add a new domain, email [email protected] with the subject line "Add Domain: [your-domain.com]" from an email address on that domain

Adding multiple domains is a Plus feature. If you need to link additional domains, you may need to upgrade your subscription.
Booking Administration
Admins and Booking Administrators can view and manage all bookings across the workspace via Manage > Bookings.
Booking on behalf of a user
When creating a booking as an admin, the booking screen includes a user selector pill at the top. Tap on it to search for a user by name, then select the person you are booking for. The rest of the process works the same as a regular booking: select the date, time, and desk on the floor plan, then tap "Book".

The bottom sheet will show "On behalf of [user name]" to confirm who the booking is for.
Booking Settings
Configure the default rules for desk bookings across your organisation. These apply company-wide, but can be overridden per building.
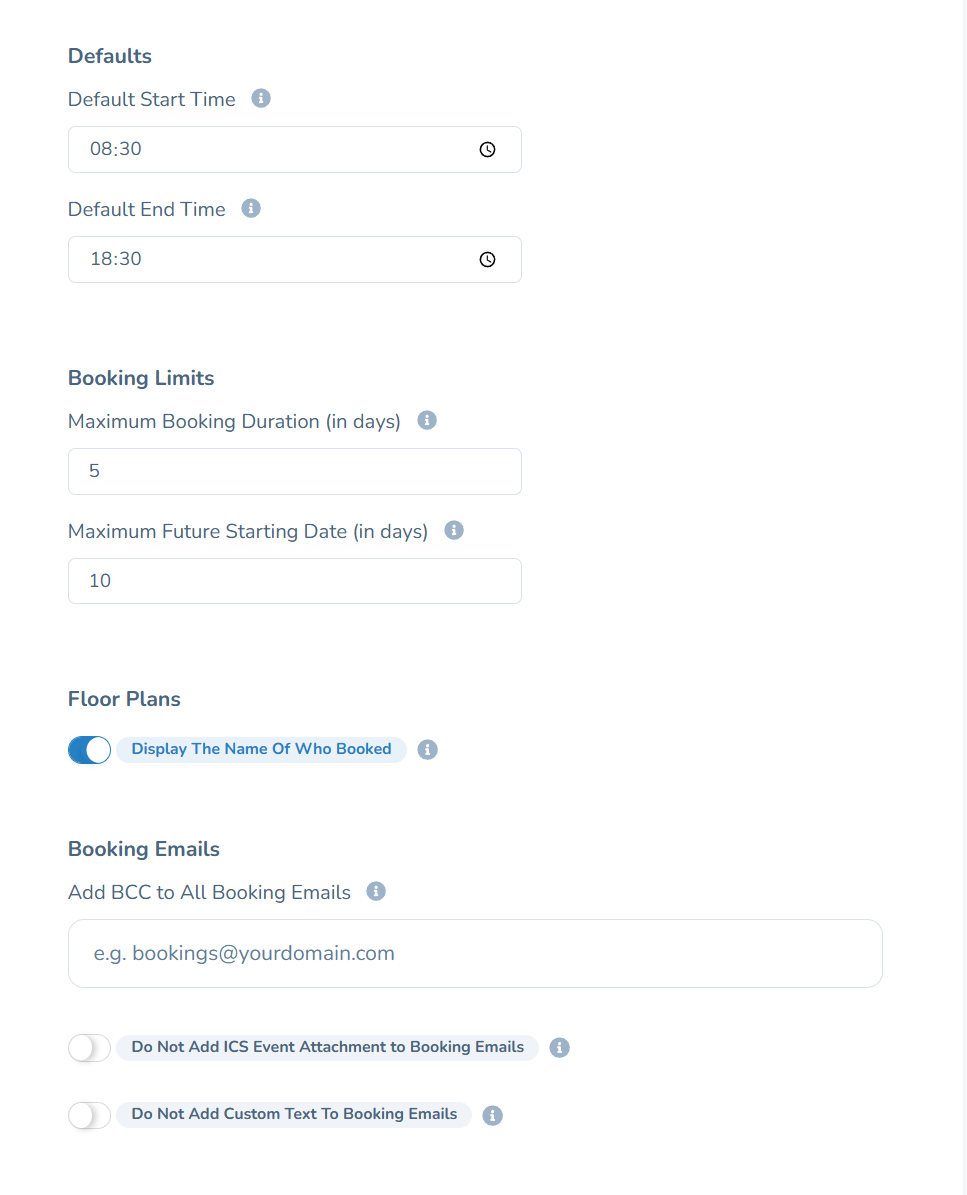
Defaults
- • Default start time and default end time for new bookings
Booking limits
- • Maximum booking duration in days. Limits how long a single booking can be
- • Maximum future starting date in days. Controls how far in advance users can book
Floor plans
- • Display the name of who booked. Toggle whether the booker's name is shown to other users when they view a busy desk on the floor plan
Booking emails
- • BCC address. Add an email address to receive a copy of all booking notification emails
- • Calendar invitations. Enable ICS event attachments on all booking emails so users can add bookings to their calendar
- • Custom email text. Add custom markdown content to the beginning or end of all booking notification emails
Check-in Settings
Configure whether and how users must check in to their bookings. These settings apply company-wide, but can be overridden per building.
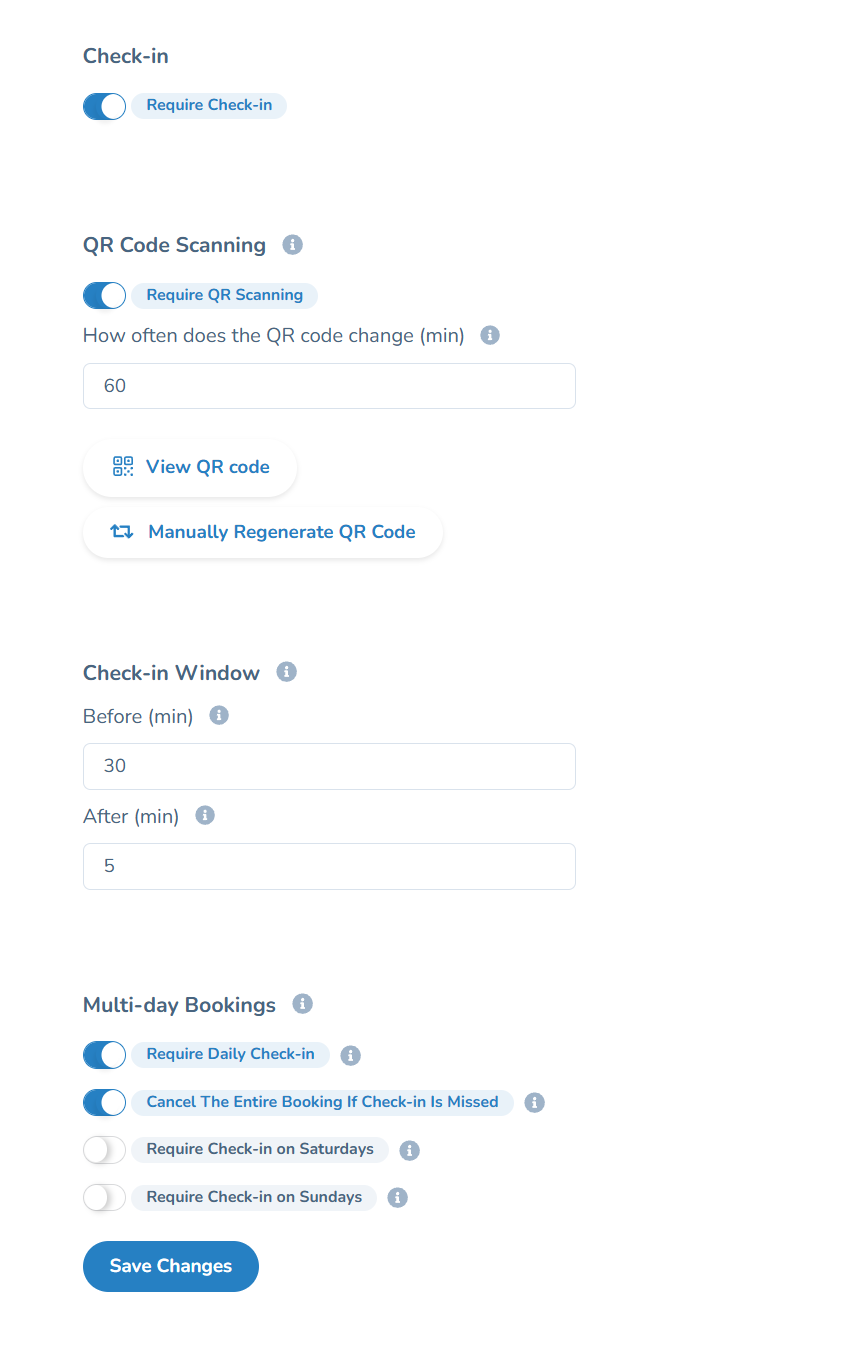
Check-in
- • Require check-in. Master toggle to enable or disable check-in for all bookings
QR code scanning
- • Require QR scanning. When enabled, users must scan a QR code at their desk to check in (instead of tapping a button)
- • QR code regeneration frequency. How often the QR code rotates, in minutes
- • View and manually regenerate the current QR code
Check-in window
- • Before booking start. How many minutes before the booking starts the check-in window opens
- • After booking start. How many minutes after the booking starts the check-in must be completed
Multi-day bookings
- • Require daily check-in. When enabled, users must check in each day of a multi-day booking
- • Cancel the entire booking if check-in is missed. Automatically cancels the remaining booking if a daily check-in is missed
- • Require check-in on Saturdays and Sundays. Optionally enforce check-in on weekends
Tip: Individual users can be exempted from check-in by enabling "Automatically Checked-In" on their user profile page.
Analytics
Access detailed analytics about your workspace usage under Manage > Analytics. Analytics help you understand how your office is being used and make data-driven decisions about space planning.
Booking Behaviour
See trends in booking volume over time, peak usage hours, and popular days. Understand how your team books desks.
Space Optimisation
Identify underutilised desks and floors. See occupancy rates and make informed decisions about your office layout.
Team Analytics
View booking patterns by team to understand which departments use the office most, and when.
Forecasting
Use historical data to forecast future desk demand and plan your workspace capacity accordingly.
Analytics data can also be exported as a PDF report for sharing with stakeholders. Admins can opt in to receive weekly and monthly analytics digests via email from their Notifications & Privacy settings.
Troubleshooting
If you encounter an error while creating a booking, an error message will be displayed with more information. Common issues include:
Overlapping bookings
You already have a booking for the selected time period. Delete or modify the existing booking first, or choose a different time.
Maximum capacity reached
The office has reached its maximum allowed occupancy for that day. Try booking a different day or ask your admin about capacity limits.
Desk already reserved
Another user has booked this desk for the selected time. Choose a different desk (shown in green on the floor plan).
Invalid booking period
This can occur when the start date is after the end date, the booking exceeds the maximum duration allowed by your company, or the booking date is too far in the future.
Network errors
Check your internet connection and try again. If the problem persists, try refreshing the page or reopening the app.